
Table of contents
- FPGA Learning Part One: Hardware Programming Language
- Three main parts of learning
- System Verilog
- FPGA Learning Part Two: Basic Knowledge,
- FPGA Learning Part Three: Development Tools
- Conclusion
FPGA Learning Part One: Hardware Programming Language
We need to get to know theFPGAprogramming language. The language used in FPGA development is known as Hardware Description Language (HDL), or Register Transfer Level Language (RTL), and is referred to generally as RTL in the following. This is in contrast to C, C++, Java, and other “high-level” languages used in software development. Because programming FPGAs in C or Python is beyond the scope of this article for beginners, I encourage you to read my previous article, “High Level Synthesis: Unlocking the Last Piece of the Puzzle for a Wide Range of FPGA Applications,” for more information. RTL coding proficiency is still necessary, at least based on the current demand for FPGA employment across multiple industries.
The two most popular hardware description languages are System Verilog andVHDL. Both VHDL andVeriloghave advantages and downsides, with Verilog having a more flexible syntax and resembling C more than VHDL does. It is advised to start with an experienced master can when comparing VHDL and Verilog. Applications requiring simpler logic operations, like glue logic, interfacing, and small-scale control systems, are ideal forCPLDs. FPGAs are more capable in terms of logic capacity and can accommodate more gates and flip-flops. This essay is not focused on comparing who is good and who is terrible. According to my own opinion, it is best to learn Verilog first, especially if you have a basic understanding of the C programming language. You might think about returning to VHDL after gaining some development experience because it’s probable that parts of the actual project’s modules are written in Verilog and others in VHDL. So even if your writing is sloppy, you still need to be able to comprehend the VHDL architecture.

Three main parts of learning
- Syntax
- How to do circuit design in this language
- How to do verification in this language
Syntax
There are several books on Verilog syntax, but the material is essentially the same across all of them, so don’t get too confused trying to figure out which one to pick; instead, discover a solid assessment of the good. “Verilog Digital System Design Tutorial” or “Verilog HDL Advanced Digital Design” are the more well-known ones. No matter whatever book you choose, it is advised that you spend some time studying the Verilog syntax. You don’t need to remember it; instead, you should have a solid grasp of the fundamental purposes and uses of each grammar.
Synthesizable (Synthesizable) and non-synthesizable (Non-synthesizable) Verilog syntax can be separated into these two categories. This clause of the sentence is synthesizable if it can produce the appropriate hardware circuit. If you only have a short amount of time, we can start by looking at the little amount—only approximately 10 statements—of synthesizable Verilog syntax. After becoming adept at it, we’ll examine the Verilog statements that are not integrable and are mostly used for simulation and verification.
How to do circuit design in this language
Combinational circuits and timing circuits are the two primary components of RTL logic design. The arithmetic circuits such as addition, multiplication, signed and unsigned numbers, multiplexers, and other gate circuits are examples of combinational circuits. Timing circuits, such as registers, synchronous and asynchronous clocks, reset, counters, shifts, etc., should be proficient, especially state machines. The HDLbits website has a ton of related subjects.
Beginners learn how to create a test platform and create straightforward test cases before moving on to RTL verification. Verification can be highly complicated, as demonstrated by the widely used UVM in the industry or the formal approaches previously discussed, for example. Despite having studied this field of validation for almost three years, I still have a lot to learn. Therefore, these components do not need to be grasped when we begin for novices. We will go into greater detail about these cutting-edge verification approaches in the following post.
How to do verification in this language
Because they tend to approach hardware in the same way that they approach software programming, beginners have the most trouble learning RTL. In actuality, hardware programming is typically done in parallel rather than sequentially, which is a significant attitude shift. When learning Verilog, this makes it necessary for us to think more deeply about the corresponding circuit. For example, when writing a for loop in Verilog, we should consider the type of circuit structure that it synthesizes; when using if else and case statements, we should consider how they differ from the generated circuit; and so on.
When learning for a while, if we can visualize the circuit topology for a certain logic function, then implement it in Verilog, and write some basic simulation environments and test cases, then it indicates that we have very thoroughly mastered this portion of the RTL language.
SystemVerilog
Verilog的超集,SystemVerilog添加号码ous capabilities that Verilog does not support but which are very beneficial, such as custom types, structure unions, and interfaces, among other things. SystemVerilog is backwards compatible with Verilog. Additionally, there are additional capabilities for simulation and verification that are based on SystemVerilog implementation, such as random constraints and UVM, which are frequently used in the industry for verification. In addition, it greatly simplifies some Verilog syntax expressions. For example, you no longer need to jumble up a signal’s wire or regulation; in SystemVerilog, logic may be used directly; there are many more that I won’t describe.
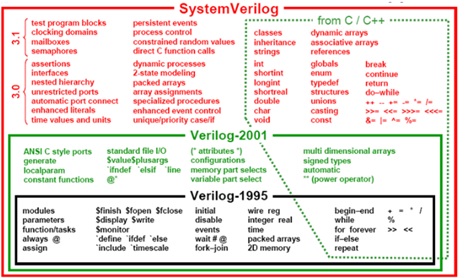
The main reason I do not currently suggest 0-based self-learning SystemVerilog for beginners is that I have not yet discovered any excellent materials for Chinese novices. However, you can move into position if your institution or training program specializes in teaching SystemVerilog. The book I’ve been reading is called “SystemVerilog hardware design and modeling” and I got it ten years ago. It’s a great tool book. However, keep in mind that it is not a textbook for SystemVerilog, thus if you are just getting started, reading this book will likely leave you perplexed. After reading this book and completing your Verilog training, switching to SystemVerilog will be simple.
FPGA Learning Part Two: Basic Knowledge
After talking about the programming language, let’s take a look at the second part of getting started with FPGAs: the basics. Here there are mainly two parts of professional foundation courses and FPGA-related professional knowledge.
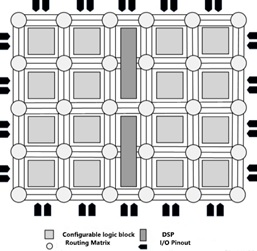
我t needs little explanation that the professional foundation courses—circuits, digital electricity, computer architecture, interfaces, digital signal processing, etc.—are required for university students majoring in electronics. For those who wish to switch their major in order to work with digital chips or FPGAs, priority should be given to looking at the amount of electricity, and other content should be dependent on the professional field you want to work in. The professional knowledge of FPGA, such as the fundamental design of the FPGA chip and the design of some of its fundamental components, such as lookup tables, logic units, logic blocks, DSP, memory, etc. This part of the content, we recommend reading the official FPGA documentation, of course, many books teaching FPGAs will also have this content, we will talk about next.
Understanding the FPGA development flow, which mostly consists of phases like design, simulation, synthesis, mapping, layout, and wiring, timing convergence, image download, and hardware debug, is another crucial component. There are several minor components to this as well, like time and space restrictions, simulation at each stage, etc. At the very least, we should be aware of the purposes served by each stage and why each step is necessary.
FPGA Learning Part Three: Development Tools
The use of FPGA development tools is also a must to master the content of the introduction to FPGA. At present, the most mainstream FPGA development software there are two, that is, Celeris / AMD Vivado, and Intel’s Quartus. here again to a second choice, we have to choose according to their own circumstances, such as your school is teaching who’s FPGA, or you use who’s development board, or who you have on hand license and so on. In the introductory stage, I recommend focusing on a platform, there is no need to learn both. One got through the other actually change the soup not change the medicine. The purpose of learning FPGA development tools are mainly the following 3 points:
Step One: Get familiar with the FPGA development process
For example: how to create a project, how to add files, how to run a series of compilation processes, how to add timing constraints, how to assign pins, and then how to load the generated FPGA image onto the development board to run.
Step Two: Get familiar with the usage of some common IPs
在FPGA的项目中,我们将使用许多不同的知识产权有限公司res, such as PLL, FIFO, memory, etc., which can help us improve the efficiency and performance of the design and avoid duplication of wheel building. So we should learn how to configure and call these commonly used IPs. in addition there are some complex ones including soft core processor NIOS, and some IPs for communication such as Ethernet controller, PCIe, DDR controller and so on. At the beginning of the study generally do not need to see, when the advanced time to see it is also too late.
Step Three:
Learn common hardware debugging and timing analysis methods. For instance, how to use signaltap to perform some basic hardware tests, how to analyze and adjust the design when the timing does not converge, etc.
Step Four:
Do it by yourself, it’s similar to speaking on paper to learn hardware without touching the board. Therefore, it is recommended to combine the development board and the reference book of experimental procedures and run through the procedure outlined before several times from beginning to end. These days, there are a lot of books like this available; in fact, the content is quite similar. Examples of more traditional experiments include traffic lights, buttons, digital tubes, running lights, common bus communication, and various data and signal processing experiments.
我looked at the literature the wealthy kids had read, and I think many other students have as well. I borrowed the school’s board instead of purchasing his development board. There are currently many of these development boards on a treasure, so if you want to buy, I don’t think you need to spend a lot of money; the essential functionality can be had. I won’t offer any advice for the large majority of boards that I haven’t used. You can leave a message here or send me a private message if you glance at a board but are unsure of whether it is appropriate.
Conclusion
The learning path and knowledge requirements for getting started with FPGA are sorted out in this article into four primary categories: programming language, development tools, fundamental knowledge, and actual hardware experimentation. If you are able to master these, you will have actually created a relatively strong foundation for studying at higher levels.
These points are simple to state, but they need actual effort spent studying. Learning anything new, including FPGA, is never a task that yields a crop. We are attempting to develop self-discipline in addition to learning these professional topics, as well as in the cultivation and application of their own capacity for continuous learning, the courage to take on risks, and the fortitude to persevere in the face of setbacks and problems. I really think that you get what you pay for, and that you will undoubtedly value your today’s efforts tomorrow. I wish you all to enjoy this learning process, and I hope to work with you to keep becoming a better version of yourself through hard work.